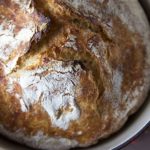
No Knead Bread
This beautiful No Knead Bread just magically becomes the most delicious loaf of bread you've ever cooked or seen! It's miraculous how little work goes in to this, you've GOT to try it!
Ingredients
- 6 c. bread flour plus more for work surface
- 1/2 t. instant or active-dry yeast
- 2 1/2 t. salt
- 2 2/3 c. cool water
Instructions
-
In a large bowl (I used my Bosch), combine the flour, yeast, and salt. Add the water and stir until all the ingredients are well incorporated; the dough should be wet and sticky. If you've used a stand mixer, transfer dough to a large bowl. If you mixed the dough by hand in a large blow you won't need to transfer it to another bowl.
-
Cover the bowl with plastic wrap. Let the dough rest 12-18 hours on the counter at room temperature.
-
When surface of the risen dough has darkened slightly, smells yeasty, and is dotted with bubbles, it is ready. Lightly flour your hands and a work surface. Place dough on work surface and sprinkle with additional flour. Fold the dough over on itself once or twice and, using floured fingers, tuck the dough underneath to form a rough ball. Generously dust a cotton towel with enough flour to prevent the dough from sticking to the towel as it rises; place dough seam side down on the towel and dust with more flour. Cover with the edges or a second cotton towel and let rise for about 2 hours, until it has doubled in size.
-
After about 1 1/2 hours, preheat oven to 425 F. Place a 6-8 quart heavy covered pot, such as a cast-iron Dutch oven, in the oven as it heats.
-
When the dough has fully risen, carefully remove pot from oven. Remove top towel from dough and slide your hand under the bottom towel; flip dough over into pot, seam side up. Be very careful not to touch the dutch oven. It will be VERY hot! Shake pan once or twice if dough looks unevenly distributed; it will adjust as it bakes.
-
Cover and bake for 40 minutes. Uncover and continue baking for 10-15 more minutes, until the crust is a deep chestnut brown. The internal temperature of the bread should be around 200 F. You can check this with a meat thermometer, if desired.
-
Remove the bread from the pot and let it cool completely on a wire rack before slicing.
Recipe Notes
You could also use all-purpose flour, but bread flour is recommended.
Adapted from Frugal Living NW