*This recipe was originally published 10/23/13. Most recent update 12/11/18

I have never, ever been able to make homemade caramel. You know how there are some things that just aren’t meant to be? Well I had come to terms with the fact that I just wasn’t meant to ever be able to make caramel. That is.. until now!
With the holiday planning nearly in full swing and with our abundance of apples, I decided to give it just one more try. I’m so glad that I did. This has to be the best caramel I’ve ever had! It was so simple and ended up being absolutely wonderful. Give it a shot, and if you do – let me know what you think by leaving a comment!
Aside from pouring this straight into your mouth (don’t judge), I highly recommend it on my Pecan Pie Cheesecake for starters, but it would also be great on my Caramel Apple Muffins or Caramel Apple Tart. Heck, I can’t think of many things this wouldn’t be good on!
How to make Basic Homemade Caramel
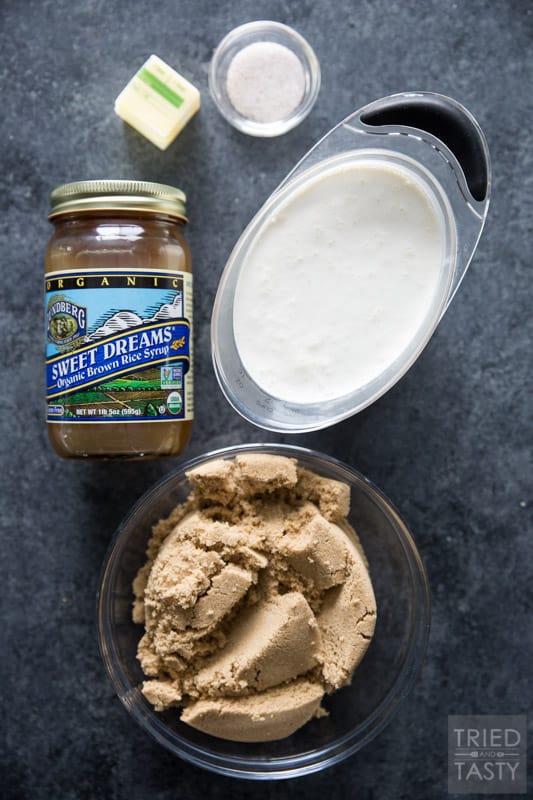
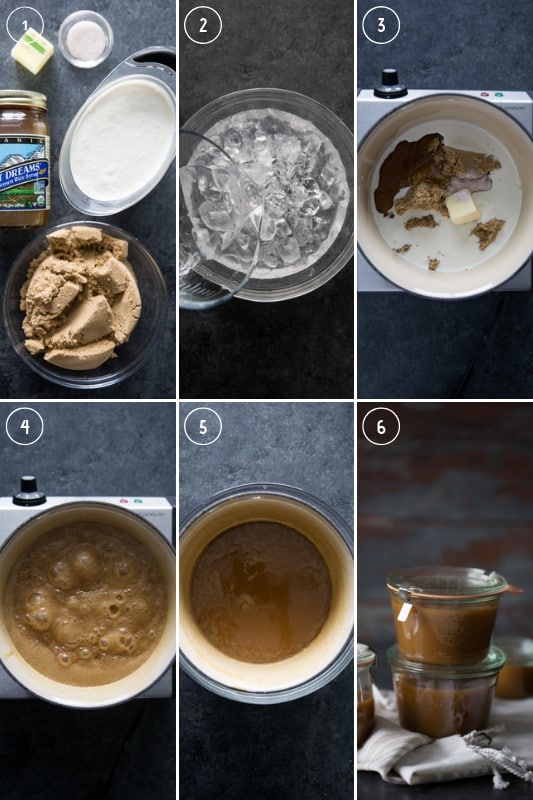
1. Gather your ingredients. You’ll need light brown sugar, heavy cream, brown rice syrup, butter and salt.
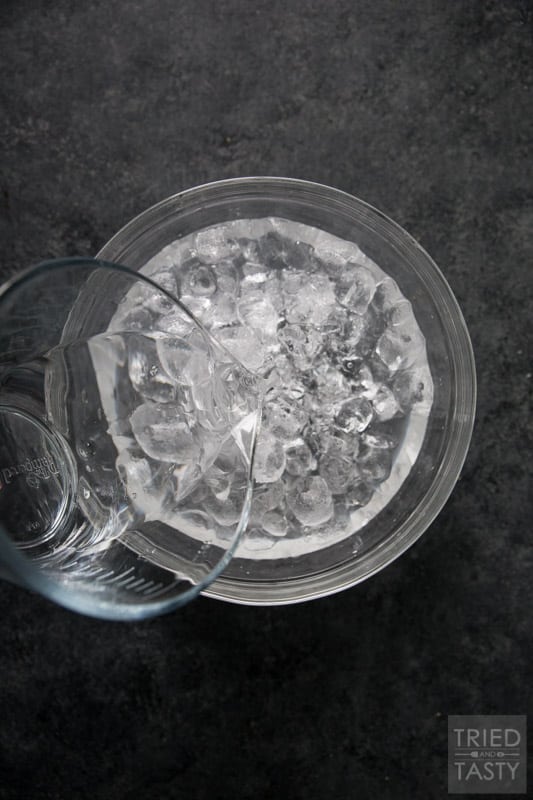
2. Before you start cooking your ingredients, you’ll want to prepare an ice bath. Fill a large bowl with ice cubes & cover with cold water; set aside.
3. Combine all of your caramel ingredients in a medium saucepan and bring to a boil over medium-high heat.
4. Stirring regularly, cook until the mixture registers 250°F on a candy thermometer (I recommend this one from Thermoworks), approx. 10-20 minutes (could be longer).
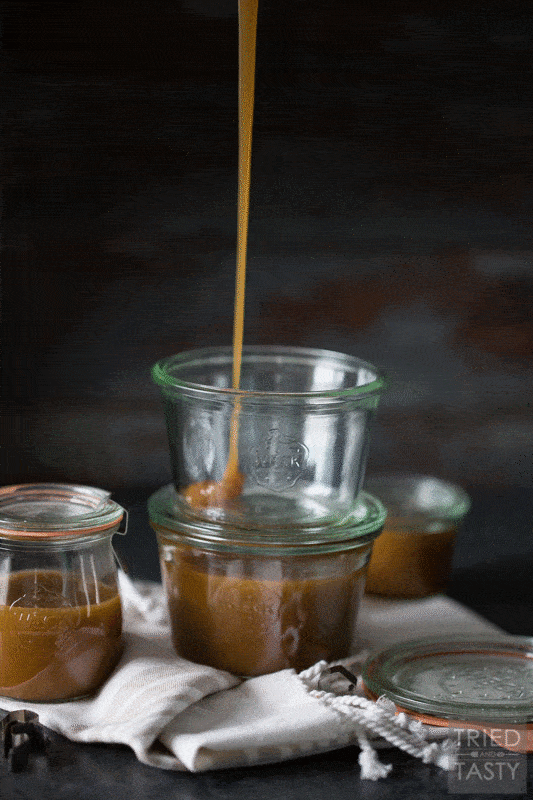
5. Once your caramel has reached the recommended temp, remove from stovetop & immediately dip the bottom of the saucepan in the ice water bath and let it chill until the bubbles have subsided, about 1 minute. Be careful not to let the ice bath overflow into the pot of caramel. Stir until stiff caramel from the bottom is incorporated into the warm caramel on top.
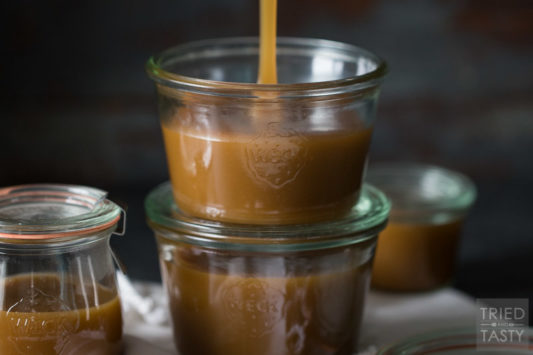
6. Remove from the water bath, transfer to storage jars & enjoy!
Expert tips on making Basic Homemade Caramel
- Be prepared! Have your thermometer right next to you because you’ll need to be stirring constantly – you won’t want to be on the hunt for a thermometer while you should be stirring (very important). Also make sure your ice bath is ready the second your caramel comes up to temp.
- About Brown Rice Syrup: I don’t buy corn syrup anymore and found a great alternative. “Brown rice syrup, also known as rice syrup or rice malt, is a sweetener derived by culturing cooked rice with enzymes to break down the starches, then straining off the liquid and reducing it by cooking until the desired consistency is reached.” – Wikipedia.
- I found my jar at my local health food store and much prefer using it in recipes rather than corn syrup. If you don’t want to hunt for it in grocery stores, you can also get it on Amazon!
- Not all salt is created equal! I’ve found that Real Salt® really enhances the flavor of the caramel!
- The temperature of the caramel is very important. A candy thermometer is a must (see above for the one I’d recommend you buy!). You don’t want to go based on time alone, because my caramel isn’t always ready at precisely the recommended time.
- I used an enameled cast iron pan. It provides even heat distribution & it’s nonstick. You could also use stainless steal. However, I would not recommend using a regular cast iron due to how sticky the caramel is.
- Use a rubber spatula or rubber whisk for stirring. This will prevent scratching on the bottom of your pan. My favorite spatulas are the $0.99 cent ones at IKEA. If you happen to grab some on your next shopping trip you won’t be sorry. Hands down one of my favorite kitchen tools.
- Store your caramel in an airtight container in the refrigerator for 2-3 weeks. I prefer glass Weck containers which can be found at places like World Market or Crate & Barrel. You could also use glass pyrex dishes which can be purchased almost anywhere.
- Caramel can be reheated on the stovetop in a saucepan on med-high heat for a couple of minutes until runny. It can also be reheated in the microwave in increments of 30 seconds at 50% power, stirring in between.
- This caramel makes great gifts. Think neighbor gifts during the holidays – it is fantastic paired with granny smith apples!
- This caramel will not harden. Do not use in recipes where you’re wanting a sturdy caramel that will hold up. This recipe cannot be used for traditional caramel apples (it will slide right off). You also wouldn’t want to use it for caramel popcorn or in fudge.
- If you attempt caramel apples this caramel will ooze and drip right off the apple. No matter what; refrigerating the apple after dipping it, freezing the apple after dipping it, and I even tried letting the caramel cool considerably before dipping – it will not work.
Looking for other great recipes to use this caramel on?
If you make this recipe I’d love to hear your thoughts. Be sure to leave a comment below and/or rate the recipe; or if you take a photo & share to social, tag @triedandtasty so that I can check it out! Also, be sure to follow Tried and Tasty along on Facebook, Instagram, Pinterest & Twitter to keep up with all the latest recipes!
Basic Homemade Caramel
Store bought caramel doesn't hold a candle to this homemade version. Made with only five ingredients you can whip this up in no time at all. Perfect over ice cream, on top of brownies, drizzled over cinnamon rolls or simply on a spoon itself! Once you've had this homemade version you'll never reach for the jar at the store again.
Ingredients
- 2 c. packed light brown sugar
- 1 3/4 c. heavy cream
- 3/4 c. brown rice syrup or dark corn syrup
- 2 tbsp. unsalted butter
- 2 tsp. kosher salt
Instructions
-
Prepare an ice water bath by filling a bowl halfway with ice and cover with cold water.
-
Combine ingredients in a medium saucepan (preferably enameled cast iron or stainless steel) and bring to a boil over medium-high heat; stirring constantly with a rubber spatula or rubber whisk.
-
Cook until the mixture registers 250°F on a candy thermometer, approx. 10-20 minutes (could be longer).
-
Remove from heat & immediately dip the bottom of the saucepan in the ice water bath and let it chill until the bubbles have subsided, about 1 minute.
-
Stir until stiff caramel from the bottom is incorporated into the warm caramel on top. Remove from the water bath.
-
Store 2-3 weeks in an airtight container in the refrigerator. To reheat caramel place on the stovetop in a saucepan on med-high heat for a couple of minutes until runny. Could also be reheated in the microwave in increments of 30 seconds at 50% power, stirring in beteen
Recipe Notes
- Be prepared! Have your thermometer right next to you because you'll need to be stirring constantly - you won't want to be on the hunt for a thermometer while you should be stirring (very important). Also make sure your ice bath is ready the second your caramel comes up to temp.
- About Brown Rice Syrup: I don't buy corn syrup anymore and found a great alternative. "Brown rice syrup, also known as rice syrup or rice malt, is a sweetener derived by culturing cooked rice with enzymes to break down the starches, then straining off the liquid and reducing it by cooking until the desired consistency is reached." Wikipedia.
- I found my jar at my local health food store and much prefer using it in recipes rather than corn syrup. If you don't want to hunt for it in grocery stores, you can also get it on Amazon!
- The temperature of the caramel is very important. A candy thermometer is a must (see above for the one I'd recommend you buy!). You don't want to go based on time alone, because at the recommended time, my caramel wasn't ready.
- I used an enameled cast iron pan. It provides even heat distribution & it's nonstick. You could also use stainless steal. I would not however recommend regular cast iron for best results.
- Use a rubber spatula or rubber whisk for stirring. This will prevent scratching on the bottom of your pan. My favorite spatulas are the $0.99 cent ones at IKEA. If you happen to grab some on your next shopping trip you won't be sorry. Hands down one of my favorite kitchen tools.
- Store your caramel in an airtight container in the refrigerator for 2-3 weeks. I prefer glass Weck containers which can be found at places like World Market or Crate & Barrel. You could also use glass pyrex dishes which can be purchased almost anywhere.
- Caramel can be reheated on the stovetop in a saucepan on med-high heat for a couple of minutes until runny. Could also be reheated in the microwave in increments of 30 seconds at 50% power, stirring in between.
- This caramel makes great gifts. Think neighbor gifts during the holidays - could be paired with granny smith apples, which would be great for dipping slices.
- This caramel will not harden. Do not use in recipes where you're wanting a sturdy caramel that will hold up. This recipe cannot be used for traditional caramel apples (it will slide right off). You also wouldn't want to use it for caramel popcorn or in fudge.
Adapted from CHOW

This was absolutely wonderful. I used the recipe with the pecan cheesecake and it was the biggest hit of the desserts this Thanksgiving. I have so much left over so I will put it to good use. Randy
Yvonne
Ooh this caramel is heavenly! I’m so happy you make this, makes my heart smile! Leftovers are good, and I’m sure they won’t be around for long!
This was a fail for me. Cooking it to 250 on the candy thermometer gave me a worthers buttery candy instead of a fondue sauce when it cooled. I will try it again, but reduce the temp when it starts looking more pourable probably about 220-230 degrees on my candy thermometer. I did use corn syrup instead of the brown rice syrup you reommend, but I dont think that made any difference in the consistency.
Yvonne
Oh no! I’m sorry it didn’t work out for you. With my caramel, it didn’t get to that hard consistency until I had refrigerated it. When it was warmed by the fondue pot it was perfect. I’m happy you are willing to try it again – let me know if you have any questions and I will try my best to help. I don’t think the corn syrup would make a difference, they are both very similar and same consistency. Best of luck on round two and thank you for the comment. It is appreciated!!
joanne
yum, this sounds great and I’m gonna try it
Yvonne
Yay! I hope you like it, I loved it! Let me know what you think and if you have any questions!
You mention it doesn’t work for caramel apples, but did it stay on the cut slices for the fondue just fine?
Yvonne
It doesn’t work for caramel apples because the caramel on apples needs to harden and “stay put”. The consistency of this caramel doesn’t work well for that. Fondue on the other hand is supposed to be creamy and oozy, which makes this recipe PERFECT for quick dippers. It stays on just fine and long enough for a quick dip in the caramel, quick dip of the topping and right in to your mouth! :) So delicious! Great question, thanks for asking!
Your caramel sauce turned out beautifully, Yvonne…glad you finally found a keeper recipe! This caramel sauce would make the drawer full of apples in my fridge verrrry happy (not to mention, two little boys I know)! ;)
Yvonne
Thank you so much Samantha! I’m so happy too! Yessssss you should make some… you won’t be disappointed!
Oh dear… this looks incredible! I have a weakness for creamy caramel. I just might have to make this soon!
Yvonne
If you’ve got a weakness my friend.. then stay away.. at least for three more days ;) We’ve got a health challenge to win!!
I have the hardest time with caramel and needed some today for a recipe. I’m excited to try out the rice syrup!
Yvonne
I’m so happy to hear I’m not the only one that struggles with caramel – it is so hard!! Well.. can be, until I found this recipe! Love it!
Good to know about the rice syrup substitution for corn syrup. You can teach me all your ways :)
Yvonne
I have slowly replaced a lot of my conventional ingredients with the healthier variety and love finding new things and learning about options! Happy to pass the information along :)
Looks SO good. I love homemade caramel sauce.
Yvonne
Isn’t it great?! I’m just happy I found a recipe that finally works for me!
This looks soooooooo heavenly!! The recipe seems pretty easy too! Thanks so much for sharing – always love seeing what yummy thing you will post next! :)
Yvonne
It is just as heavenly as it looks!!! Great recipe and very simple. From someone who couldn’t make caramel to save her life, this recipe here is the money maker :) Thanks for stopping by and I’ll keep bringing great recipes!!